Friday, September 28, 2012

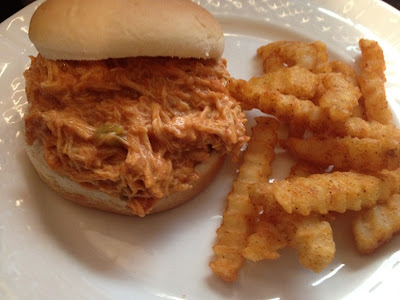
Crockpot Salsa Chicken


I've decided to start thinking of my crockpot as my personal chef.  I mean really, I give it a few ingredients and walk away only to return later that day to find dinner all ready to serve. Sounds like a chef to me.

Today, it only took 5 ingredients to get a fantastic dinner. Boneless chicken breasts, a can of cream of chicken soup, a jar of salsa, a packet of taco seasoning and a cup of sour cream.  The result was a creamy, spicy treat that when piled high on a bun with a side of seasoned fries made for a wonderful casual dinner. It doesn't have to be just for sandwiches though. It would be equally delicious atop some rice, a great filler for chicken tacos or layered across some tortillas for some mind blowing spicy chicken nachos.

Stir together one can of cream of chicken soup, 1 jar of salsa (I used Pace Medium) and 1 packet of taco seasoning in the bottom of your crockpot.


Next place 3 or 4 boneless chicken breasts into the mixture making sure to spoon some of the mixture over the top of your chicken breasts to cover them  nicely.  Set it on low, put the lid on it, slide it to the back of the counter and let it cook for about 4 1/2 hours.


Remove the chicken breasts from the crockpot to a cutting board. Using two forks shred the chicken. Mine literally just fell apart and only took about 2 minutes to shred up.  Return your shredded chicken to the crockpot, add in 1 cup of sour cream, stir it up until it's thoroughly mixed and cook for another 30 minutes.

The hardest part about this dish is deciding how you want to serve it. Our sandwiches were amazing but we'd like to hear what you choose to do with it!!

Ingredients:

1.5lbs boneless chicken breasts
1 can cream of chicken soup
1 jar salsa
1 packet of taco seasoning
1 cup sour cream

Mix soup, salsa and taco seasoning in crockpot, add in chicken breasts covering them with  mixture. Cook 4.5 hours. Remove chicken breasts to cutting board and shred them. Return to crockpot along with 1 cup of sour cream. Stir thoroughly and cook for 30 more minutes.

Saturday, September 22, 2012

Crockpot Pot Roast


This is hands down the easiest pot roast recipe ever. So simple that it caused a debate about whether or not it was really cooking.  Last month I made the recipe for the first time and shared it on Facebook. One of my friends posted a comment stating "it sounds delicious and simple enough for even me to cook, IF I cooked". After a little prodding, she tried it for herself and was amazed at how well it turned out.  As a morning radio show host, she took the to the airwaves the next morning to share the recipe with her listeners.  Her male co-host replied that if you're just adding a handful of simple ingredients to a crockpot and letting it sit, "you're not really cooking".  The overwhelming consensus at the end of the debate was "if you start with raw food and end up with cooked food then it's COOKING".  I myself will admit that's it's really so easy that come dinner time I barely feel like I cooked and I'm quite alright with that. 


One roast, three little packets and a bit of water, yep that's all it takes!!  Place your roast in your crockpot.  In a small bowl mix one packet of Brown Gravy mix, one packet of Ranch Dressing mix and one packet of Italian Dressing mix with a half cup of water. Stir it well and dump it over your roast. Place the lid on the crockpot, turn it on low, slide it to the back of your counter and forget it about for 7-8 hours.  About thirty minutes before dinner time, I added in a jar of mushroom slices.  The roast is tender and the au jus is absolutely wonderful.  I can assure you the results far outweigh the effort. Give it a try for yourself!

Thursday, September 20, 2012

Philly Cheesesteak Stuffed Peppers


Love Philly Cheesesteak Sandwiches but watching your carb count?  You're going to love these!  I'm always on the lookout for healthier recipes to add into the mix. We both love our guilty pleasure meals and our desserts so it is helpful to find a balance in the diet.

Our 2 little pepper plants put out a nice little crop of peppers late in the season. "Little" being the keyword. I kept waiting for them to get bigger but they decided they were done growing and it was time to pick them and find a use for them. Not a big challenge as we love peppers.


A few months back I had copied a recipe for a different twist on stuffed peppers that called for 2 large bell peppers but I didn't see why our crop of little fellas wouldn't suffice, so I picked up the ingredients on the last shopping trip.  Sitting on the patio enjoying last evening's crisp sunny backdrop for dinner, I was glad that I did.  


Slice your peppers in half lengthwise, remove the ribs and seeds and line each pepper with a piece of Provolone cheese.


In a large skillet, saute mushrooms, onions, and garlic in butter and olive oil until caramelized (About 20-25 minutes) then add in deli counter roast beef cut into thin strips and cook an additional 5-10 minutes.


Spoon the meat and veggie mixture into your cheese-lined pepper halves. Fill them nice and full until they border overflowing! Top each one with another slice of Provolone and bake them 15-20 minutes on a foil-lined baking sheet in a 400 degree oven. 


You want your cheese lightly browned and your pepper tender. The result is all the great taste of a Cheesesteak Sandwich without all the carbs that come with that hoagie roll!  

We just made this our meal but they would make a great appetizer or snack also!

INGREDIENTS
8 oz. Thinly Sliced Roast Beef
8 Slices Provolone Cheese
2 Large Green Bell Peppers
1 Medium Sweet Onion
6 oz. Baby Bella Mushrooms
2 Tbs. Butter
2 Tbs. Olive Oil
1 Tbs. Garlic - Minced
Salt and Pepper to taste

DIRECTIONS
Slice peppers in half lengthwise, remove ribs and seeds.

Slice onions and mushrooms.  Saute over medium heat with butter, olive oil, minced garlic and a little salt and pepper.  Saute until onions and mushroom are nice and caramelized.  About 25-30 minutes.

Preheat oven to 400*

Slice roast beef into thin strips and add to the onion/mushroom mixture.  Allow to cook 5-10 minutes

Line the inside of each pepper with a slice of provolone cheese. 

Fill each pepper with meat mixture until they are nearly overflowing.

Top each pepper with another slice of provolone cheese.


Bake for 15-20 minutes until the cheese on top is golden brown. 

Serve and Enjoy!!

Makes 4 servings -  6 net carbs per serving!!!

Tuesday, September 18, 2012

Taco Soup


Last week I sat down to look at the 10 day forecast and what I'm sure made some cringe gave me a bit of a thrill.  Autumn was peeking around the corner to let us know it's on the way.  Don't get me wrong, I enjoy Summer but living in the city where it's always 10-15 degrees hotter than other places, this summer was a cooker. Weather definitely affects my appetite and my cravings. Try as I might, I just can't bring myself to eat soup when it's hot outside.  When I saw that today's forecast was highs in the 60's and lows in the 40's with a chance of rain, I knew my favorite season was on the way and it was time to welcome back "soup weather".  In our house I'm not the soup chef. That title rightfully belongs to my better half.  He's a magician at creating his own stocks from the previous night's dinner protein and always seems to know just what vegetables and herbs will make the perfect soup.  I do, however, rival him when it comes to chili.  

This summer I ran across some "Fall Soup" recipes, one of which was a "Taco Soup".  It sounded interesting at first glance but after going over the recipe it kind of sounded like a watered down chili, which didn't sound appetizing at all.  The concept was a good one and with a little tweaking it just might be an addition to our soup menu.  The original recipe was quite simple and I wanted to keep that aspect while bringing it more in line of a soup and not a subpar chili.  The reaction at the dinner table from the master himself was very positive so I bring you my version of a Taco Soup.

Ingredients

1 1/2 lbs of ground beef
1 large onion chopped
2 10oz cans of Beef Consomme
2 15oz cans of kidney beans
1 15oz can of corn
2 10oz cans of Ro-Tel Orignial Diced Tomatoes w/ Green Chiles
1 1/2 cups of water
1 packet Taco Seasoning
1 packet of Ranch Dressing Mix

In a large skillet brown your beef and onion together until fully cooked. (That's about the only effort required for this soup beyond opening cans). Drain beef mixture and dump into a 6 quart stock pot.  Add in all other ingredients, no need to drain just open them up and dump them in. Bring to a boil, reduce heat and simmer 15-20 minutes.

I served mine with a some tortilla chips and a spoonful of sour cream but go ahead and get creative with your favorite add-ins and ENJOY!!

Monday, September 17, 2012

Pizza Balls


I came on to write this post today and realized that "Wow, it's been 2 weeks since we've shared anything with our readers".  I traveled  home a few weeks ago to visit family and attend the local county fair. It's really something special, the largest county fair in the country that is only eclipsed in size by a few state fairs. It's an event that is just woven into the DNA of all who grew up there. The one time a year that the locals get to show off the hard work they put into their livestock, gardens, baking, sewing, quilting, art, photography, you name, it's there. As a youngster I had no use for the "Commercial Exhibits" but as an adult I run for those exhibit halls to see what was the newest kitchen gadget, cookware, gardening tool etc that was being demo'd.  The high anticipation of finding a new toy for my cooking and running back here to blog and tell you all about it was met with disappointment. NOTHING, nothing new at all and not much in those halls at all worth perusing made the trip through them brief.  It wasn't a total loss, however, because it just gave me more time to spend with my family.  Because you see, the Canfield Fair is a "family event" for me. Aunts and Uncles, cousins galore, sisters, brothers, nieces and nephews all there just as they all have been from the time they were in a stroller. Each as different and unique as the next, each having chosen different career paths, different cities to call home and different hobbies to occupy their time but all the same when it comes to the fair. All "home" and all "family".

A return to my home was a reminder for me of the self-imposed chaos in my house. A new sofa coming in three weeks and a total home makeover to be tackled. Every room is getting a new paint color, a new wall unit being built into the living room, hardwood floors that need a cleaning and a facelift and lots of things to be sorted and removed. I'll be posting soon on some of those projects and the how-to's of them. But alas, yesterday was Sunday and that meant "football" and "game day food".  My cousin Cathy had shared a recipe for pizza balls with me a few months back. I tried it and they caused quite a bit of stir with some of my facebook friends asking for the recipe. I held back because I knew there were some things I wanted to try to improve on these already great little treats.  One thing that didn't need improvement was the simplicity.  So easy that after the kids or that special person in your life goes nuts over them they can make it themselves. The original recipe called for a colby or cheddar cheese and I thought mozzarella would make them more "pizza-y" and trying to keep them a little more healthy I used turkey pepperoni, which if we're honest just doesn't have that much flavor.  I'm glad I held out until I made the changes because this time they were spot on and the perfect football meal.

To start, preheat your oven to 425 and grease a 9 x 13 baking dish.  Next we're going to prepare our ingredients so it's just assembly after that.  Cut a block of mozzarella cheese into 30 little cubes, fill a bowl with pepperoni slices (you're going to need 120 of them) and pop open 3 tubes of Pillsbury Buttermilk Biscuits.

To assemble, flatten a biscuit with the palm of your hand. (I've found doing this on a styrofoam plate works nicely and they are easily removable).  In the center of your flattened biscuit stack 2 slices of pepperoni, one cube of cheese and then two more slices of pepperoni.


Now just simply pull all your edges up together to hide all that yumminess inside a ball.


After you've gotten it all wrapped up, place it in your prepared baking dish with your pinched side down. Continue until you have all 30 balls placed in your dish.  Then beat one egg and brush the top of each ball and sprinkle them with garlic powder, Italian Seasoning and Parmesan cheese.


Once they bake in your preheated oven for 18-20 minutes they puff up into wonderful golden brown balls filled with gooey goodness ready to be dipped into some warm pizza sauce and munch away play by play.


Having friends over for the game? Assemble them ahead of time, cover them and leave them in the refrigerator until you're ready to pop them in the oven.  They are very filling 4 or 5 per serving easily feeds 6 or 7 guests.

Ingredients:

3 tubes of Pillsbury Buttermilk Biscuits
1 block of Mozzarella Cheese
120 slices of pepperoni
1 jar of pizza sauce for dipping
1 egg  for brushing the tops
Garlic powder, Italian Seasoning and Parmesan Cheese

Assemble balls, place in greased 9x13 baking dish, brush with beaten egg, sprinkle tops with garlic powder, Italian Seasoning and Parmesan Cheese and bake for 18-20 minutes at 425 degrees.

Warm pizza sauce for dipping and enjoy!